
Order of Draw in Phlebotomy: The Complete Guide
Every phlebotomist knows the feeling — you’re mid-draw, tubes lined up, and suddenly you second-guess yourself: did I grab the right tube first?
The order of draw in phlebotomy is one of the most critical — and most frequently tested — concepts in laboratory science. Getting it wrong can silently corrupt results, trigger repeat collections, and put patients at risk.
This guide walks you through the complete order of draw for phlebotomy, explains the logic behind every step, and includes a reference table and key mnemonics to cement your knowledge before your next clinical shift or board exam.
Table of Contents
Why the Order of Draw in Phlebotomy Matters?
When blood is drawn through a single venipuncture site into multiple tubes, traces of additives (chemical preservatives or anticoagulants inside the tubes) can carry over from one tube into the next.
If the wrong additive contaminates a subsequent specimen, it can produce entirely false laboratory values — a phenomenon called carryover contamination.
For example, EDTA (the anticoagulant in lavender/purple-top tubes) chelates calcium ions. If even a micro-drop of EDTA reaches a coagulation tube, it falsely prolongs clotting times — a result that could lead a clinician to make dangerous anticoagulation decisions.
⚠️ Patient Safety First CLSI guideline GP41 (formerly H3-A6) is the internationally recognized standard governing venipuncture procedure, including the order of draw. Always follow your institution’s SOPs alongside these guidelines.
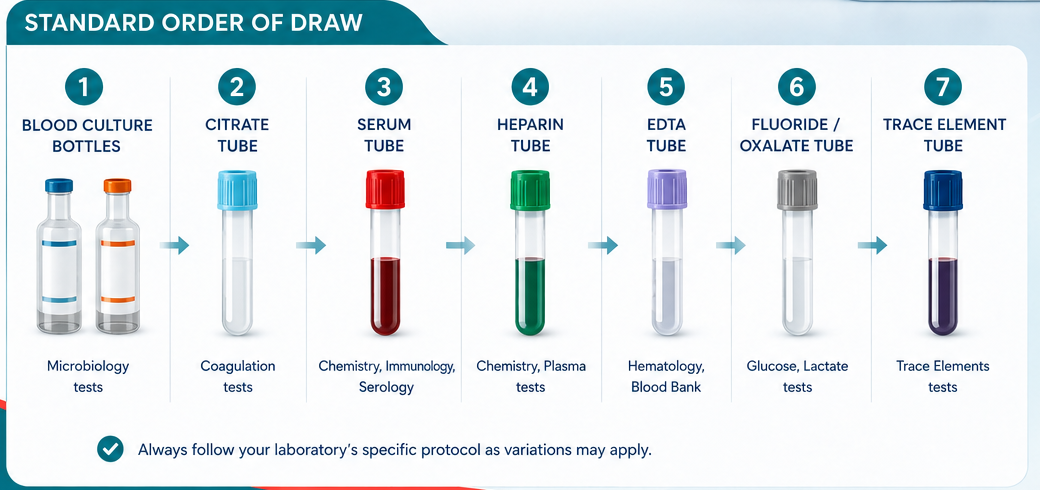
The Standard Order of Draw for Phlebotomy
The sequence below reflects the current CLSI GP41 standard order of draw. Each tube’s position is determined by its additive and the risk it poses to surrounding specimens.

💡 Royal Blue Tubes — The Exception Royal blue (trace element) tubes may contain EDTA, clot activator, or no additive. Their draw position depends on the additive inside. Always check the label before drawing.
The Mnemonic: "Stop, Look, Right, Every Boy Loves Green Grapes"
Memory tricks make the phlebotomy order of draw stick under pressure. This mnemonic maps to: Sterile (blood culture) → Light blue → Red → Early gold/SST → Big green → Lavender (EDTA) → Gray. Different institutions use their own variants — what matters is consistently following one authoritative sequence.
Step-by-Step: How to Apply the Order of Draw in Phlebotomy
Knowing the sequence theoretically is one thing — executing it under time pressure is another. Follow this systematic approach on every collection:
- Identify the patient and verify orders. Confirm name, birth date, and demographic details against the test request. This is not optional.
- Select and prepare tubes before the draw. Lay tubes out in the correct order of draw sequence so you are not seeking mid-venipuncture.
- Perform the venipuncture and immediately engage the first tube in the sequence (blood culture or light blue, depending on the order).
- Mix tubes immediately after removal. Invert additive tubes 3–10 times as specified — under-mixing causes clotting; over-mixing causes haemolysis.
- Label at the bedside while the patient is still present, then transport tubes in the correct upright position.
🔄 Inversion Counts Matter Light blue (citrate) tubes: 3–4 inversions. SST/gold: 5 inversions. EDTA: 8–10 inversions. Gray: 8–10 inversions. Follow the manufacturer’s IFU — these numbers are not interchangeable.
Common Mistakes When Applying the Order of Draw for Phlebotomy
Mistake 1 : Drawing EDTA Before Coagulation Tubes
This is the most consequential error. EDTA contamination of a citrate tube can falsely elevate aPTT and PT results. In a patient being monitored on warfarin, this could mask a supratherapeutic level and lead to a dangerous under-dosing decision.

Mistake 2: Inadequate Mixing
Haemolysis (rupture of red blood cells) from strong shaking invalidates potassium, LDH, and AST results.
Mistake 3: Underfilling Coagulation Tubes
Light blue tubes must be filled to the line. The blood-to-citrate ratio is fixed at 9:1. Under-filling dilutes the specimen and falsely prolongs clotting times. If using a butterfly (winged) set, discard the first tube (a plain tube without additive) to clear air from the tubing before the coagulation tube.
Mistake 4: Ignoring Tube Expiry Dates
Evacuated tubes lose their vacuum over time. An expired tube may not fill completely, altering the blood-to-additive ratio. Check the expiry stamp before every draw.
Order of Draw Phlebotomy: Special Scenarios
Capillary (Fingerstick) Samples
The order of draw differs for capillary collection. CLSI recommends: EDTA tubes first (to minimise platelet clumping at the puncture site), then other additive tubes, and serum tubes last. This is the opposite of venipuncture order for EDTA — a point that frequently appears in board examinations.
Only One Tube Required
When a single EDTA tube is the only requirement, there is no risk of carryover — the sequence concern applies only to multi-tube draws. However, butterfly sets always require a discard tube if a coagulation tube is the first or only specimen.
✅ Key Takeaways
✓ The order of draw in phlebotomy prevents additive carryover between tubes particularly EDTA contaminating coagulation specimens.
✓ Blood cultures go first (sterile field), followed by light blue (coagulation), then serum tubes, additive tubes, and finally EDTA and gray.
✓ For capillary (fingerstick) collections, EDTA tubes come first — the reverse of venipuncture protocol.
✓ Inversion technique and fill volume are as critical as tube sequence both affect result accuracy.
✓ CLSI GP41 is the authoritative reference; institutional SOPs may vary slightly — always know yours.
What is the order of draw in phlebotomy?
The order of draw in phlebotomy is the standardized sequence in which blood collection tubes are filled during a single venipuncture. It follows the CLSI GP41 guideline and goes: blood culture → light blue (citrate) → red → gold/SST → green (heparin) → lavender (EDTA) → pink → gray. This sequence prevents additive carryover contamination between tubes, which can falsely alter lab results.
Why is the order of draw important in phlebotomy?
The order of draw matters because each blood collection tube contains a different additive or anticoagulant. If tubes are drawn in the wrong sequence, trace amounts of one additive can contaminate the next tube — a problem called carryover contamination. For example, EDTA from a lavender tube can chelate calcium and falsely prolong PT/INR results in a coagulation tube, putting patients at risk.
What tube is drawn first in phlebotomy?
Blood culture bottles are always drawn first in phlebotomy to maintain a sterile field and prevent skin flora from contaminating the specimen. If no blood cultures are ordered, the light blue sodium citrate tube (used for coagulation tests like PT/INR and aPTT) is collected first.
What color tube is used for a CBC in phlebotomy?
A lavender (purple) top tube containing K₂EDTA or K₃EDTA is used for a Complete Blood Count (CBC). EDTA prevents clotting while preserving red blood cell morphology, making it ideal for haematology tests including CBC, ESR, HbA1c, and reticulocyte count.
Is the order of draw different for fingerstick (capillary) samples?
Yes — the order of draw for capillary (fingerstick) collection is different from venipuncture. For fingerstick samples, EDTA tubes are collected first to minimise platelet clumping at the puncture site. Other additive tubes follow, and serum tubes are collected last. This is the reverse of the venipuncture sequence for EDTA, and it is a commonly tested point in MLT board exams.
What is the main physical difference between K₂EDTA and K₃EDTA?
K₂EDTA is a dry powder spray-coated onto the inner wall of the tube. When blood enters, it dissolves and mixes uniformly without adding any volume. K₃EDTA is a liquid solution already present in the tube. This liquid dilutes the blood sample by approximately 1–2%, which can measurably affect automated cell count parameters.